Groonga CloudSearch blog
Groonga CloudSearch 1.5.0 and Groonga CloudSearch Console 1.2.0 is out, and new roadmap
2012-12-26
TweetToday, we’ve shipped Groonga CloudSearch version 1.5.0 and Groonga CloudSearch Console 1.2.0. You can download the packages and read the tutorial on the home page of this project site.
What’s new? : Groonga CloudSearch
Better compatibility to the Amazon CloudSearch
- Id part of “DocService/Arn”, “SearchService/Arn”, and “DomainId” of “DomainStatus” are now returned with the value different from the domain id string in the endpoint host name correctly. You always need to refer “DocService/Endpoint” or “SearchService/Endpoint” to know endpoint host names.
- “DefineIndexField” never merges newly specified options with previously defined options. (In other words, now “DefineIndexField” always cleared old options at old versions.)
- XML SDF batches are now acceptable. (Note: all responses from documents/batch API are still returned in JSON.)
CLI tool changes
Now gcs-configure-fields command becomes more compatible to cs-configure-fields. Existing field options are always cleared, so you have to set multiple field options at once. For this change, now the command accepts multiple ”–option” options, like:
$ gcs-configure-fields -d domain –name field –type literal –option search result
or
$ gcs-configure-fields -d domain –name field –type literal –option search –option result
Moreover, gcs-configure-from-sdf is also now available. You can define multiple index fields from existing SDF file.
Changes as a daemon
Because you always have to call APIs via HTTP, now the ”–base-host” command line option for bin/gcs and GCS_BASE_HOST environment variable are obsolete. It is automatically detected from the Host header. You don’t need to give a base host name of the server to Groonga CloudSearch processes anymore.
Better security
Now Groonga CloudSearch creates the directory to store data with the permission 0700 (full access by author, otherwise no access). If you use old versions of Groonga CloudSearch, you should set the permission of the data directory (~gcs/.gcs, ~/.gcs, and so on) to 0700 to the data directory by the chmod command.
What’s new? : Groonga CloudSearch Console
Better authentication
Groonga CloudSearch Console now activates BASIC Auth always. So it asks you to register account name and password for the administration user on the initial access. The web console can’t be accessed without authentication anymore.
Account information is stored in the directory ~/.gcs-console by default. If you need to reset the password, remove the directory.
Flexible ”–endpoint” option
Simple host name is now acceptable for the ”–endpoint” option (and GCS_CONSOLE_ENDPOINT environment variable) like ”–endpoint gcs-console.example.com:7575”. In old versions, you always had to specify full URL like “http://gcs-console.example.com:7575”.
New roadmap
Now we are planning to suspend this project and concentrate human resources to the fluent-plugin-groonga project for scalable backend based on groonga. After that, we’ll be back and work to improve Groonga CloudSearch with scalable backends.
Currently Groonga CloudSearch doesn’t support default value, source attribute, and more features of Amazon CloudSearch. We have to re-construct the database layer of Groonga CloudSearch to support these features.
On the other hand, now groonga project has started a search system based on scalable backends, with fluentd. It is the most important feature of Amazon CloudSearch but not supported by Groonga CloudSearch.
Because both changes require many many codes around the database layer. We’ll need to rewrite codes for the scalable backends in the feature, even if we now implement default value and other features. So we’ve decided to suspend this Groonga CloudSearch project for a while and concentrate development resources to the scalable backend.
Today, we’ve shipped Groonga CloudSearch version 1.4.0 and Groonga CloudSearch Console 1.1.0. You can download the packages and read the tutorial on the home page of this project site.
What’s new? : Groonga CloudSearch
Groonga CloudSearch 1.4.0 includes following three topics.
Better compatibility to the Amazon CloudSearch
- Search results are now sortable by “rank” option. Currently, only simple sort is supported. Custom rank expressions are not available yet.
- Number of searchable documents is returned as a part of response from DescribeDomains.
- “Arn” is now returned as a part of domain statuses.
- Responses for CreateDomain, DeleteDomain, DescribeDomains, DefineIndexField, DeleteIndexField, and DescribeIndexFields are now more compatible.
CLI tools improvements
Now Groonga CloudSearch CLI (Command Line Interface) tools accept “-e” (or ”–endpoint”) option to specify the endpoint of the configuration API. For example, if your remote Groonga CloudSearch server is accessible with the URI “http://gcs.example.com:7575/”, then you’ll run the gcs-describe-domain command like:
$ gcs-describe-domain --endpoint=gcs.example.com:7575or
$ gcs-describe-domain -e gcs.example.com:7575The gcs-post-sdf command had an option named ”–endpoint” but it has been renamed to ”–document-endpoint”. ”–endpoint” is now works as an option to specify the endpoint of the configuration API. So, if you have a search domain named “companies” on the remote service, you’ll run the gcs-post-sdf command like:
$ gcs-post-sdf --document-endpoint=doc-companies-xxxxxxx.gcs.example.com:7575or
$ gcs-post-sdf --endpoint=gcs.example.com:7575 --domain-name=companiesBy these changes, now gcs-commands are incompatible to the old one.
Improvements as a daemon
Now, you can configure the Groonga CloudSearch daemon (Port number, host name, etc.) via /etc/default/gcs if you installed Groonga CloudSearch from the debian package.
Moreover, log files (access.log, error.log and query.log) are available at /var/log/gcs.
What’s new? : Groonga CloudSearch Console
Groonga CloudSearch Console includes three major improvements.
Authentication
Simple access control feature is now available. Specifying a pair of username and password via a command line option ”–auth” or an environment variable “GCS_CONSOLE_AUTH” will activate BASIC Auth. For example, if you wish to use “admin” as the username and “abcd1234”, then you’ll run following command line:
$ gcs-console --auth=admin:abcd1234If you are running the Groonga CloudSearch Console as a daemon (installed from the debian package), then configurations including authentication are configured via the file /etc/default/gcs-console.
Then, you’ll be able to deploy Groonga CloudSearch Console to a public space.
(However, this is just temporally feature. In the future releases, we’ll add UIs to set and change the password via the Groonga CloudSearch Console itself.)
Management of index fields
Features to manage index fields are now available. Now you’ll create, modify, and delete index fields via the Groonga CloudSearch Console.
Posting SDF batches
Now you can upload SDF batches to post the Groonga CloudSearch server, via the Groonga CloudSearch Console.
Today, we’ve shipped Groonga CloudSearch version 1.3.0 and Groonga CloudSearch Console 1.0.0. You can download the packages and read the tutorial on the home page of this project site.
What’s new?
This release includes following two topics.
CLI tools improvements
Now Groonga CloudSearch CLI (Command Line Interface) tools communicate with Groonga CloudSearch Server via HTTP. You can configure your remote Groonga CloudSearch Server from your local computer. (Note: you have to configure privileged IP range of your Groonga CloudSearch Server to allow to configure itself from another computer. See the tutorial and the help document of the gcs command itself.)
Administrative console improvements
Groonga CloudSearch had an Web UI for configuration, named “dashboard”. Now it is separated from Groonga CloudSearch package itself. A new package Groonga CloudSearch Console (groonga/gcs-console) provides administrative Web console, instead of the old dashboard.
With Groonga CloudSearch Console, you can see your Groonga CloudSearch configuration, try searching, create and delete domain. In further releases, the console will have more features.
Today, we’ve shipped Groonga CloudSearch version 1.2.0. You can download the package and read the tutorial on the home page of this project site.
What’s new?
Groonga CloudSearch 1.2.0 includes many many improvements, and they can be described as the following three topics.
Becomes safer
Simple access-control mechanism is now available, so you can deploy Groonga CloudSearch to a public server safely.
- A search domain has its own unique ID. It guards a public Groonga CloudSearch server from unexpected accesses by any third person, because you have to access to your server with unique endpoints.
- The Configuration API (and the dashboard) became accessible only from privileged networks (“127.0.0.0/8” by default) which are specified by a command line parameter for the “gcs” command. No one except you can configure your Groonga CloudSearch server anymore.
For the first change, you need to re-create the whole database before running Groonga CloudSearch 1.2.0. Run the following command to clear the database: rm -rf ~/.gcs
Facet
You can store multiple values to an index field, and set the field to “facet returnable”. Then you can get a facet information with a part of a search result specifying the “facet” URL parameter, and you can use the result for a new search condition via the “bq” URL parameter. For example, if you have a literal field “tags”, then bq=tags:'science' will return a search result including documents which have “science” as a member of its “tags” field.
As above, Groonga CloudSearch 1.2.0 supports “bq” (complex queries).
Easy configuration
Groonga CloudSearch now includes the following commands:
- gcs-create-domain
- gcs-delete-domain
- gcs-describe-domain
- gcs-configure-field (create, update, and delete)
- gcs-configure-text-options (for synonyms)
- gcs-configure-default-search-field (Groonga CloudSearch’s extension)
- gcs-post-sdf
They are helper tools which are compatible to Amazon CloudSearch’s command line tools. You can setup your search domains only with command line tools, so you don’t have to use the configuration API via HTTP anymore, for basic usecases.
Sample application
Norema search (node reference manual search) is now downloadable, it’s an example application of Groonga CloudSearch. It will help you to build Web applications with Groonga CloudSearch.
Today, we’ve shipped Groonga CloudSearch version 1.1.0. You can download the package and read the tutorial on the home page of this project site.
What’s new?
New actions, “DeleteDomain” and “DeleteIndexField” are available for the Configuration API. Now you can delete existing search domains or index fields via the API.
“IndexDocuments” action is also available. However, because Groonga CloudSearch rebuilds indexes automatically, you don’t need to call the action manually in most cases. (Of course, still useful for optimization.)
And, now Groonga CloudSearch accepts “delete” type batches via the documents/batch API. You can delete already-indexed documents from the database.
Try Groonga CloudSearch with Amazon CloudSearch clients!
By the way, yesterday we posted a tutorial to use Groonga CloudSearch via aws_cloud_search, a client library for Amazon CloudSearch. You’ll be able to try Groonga CloudSearch more easily, if you’re familiar with development on the Ruby language.
Introduction
This article describes how to use Groonga CloudSearch with aws_cloud_search.
Groonga CloudSearch is an Amazon CloudSearch compatible open source full text search server. With Groonga CloudSearch, you can try Amazon CloudSearch APIs on your local machine.
aws_cloud_search is a Ruby library (gem) which wraps Amazon CloudSearch APIs. You can use aws_cloud_search to index your documents and search them. Though aws_cloud_search itself does not support Groonga CloudSearch, with a small hack (by monkey patching), we can direct its requests toward Groonga CloudSearch instead of Amazon CloudSearch. That means we can use aws_cloud_search gem with Groonga CloudSearch.
Prerequisites
In this article, we assume that you
- are working on some *NIX environment, such as Mac OS X and Linux.
- have finished the tutorial of Groonga CloudSearch.
- have Ruby setup and basic knowledge about Ruby.
Prepare Groonga CloudSearch and example documents
First of all, let’s try searching with Groonga CloudSearch and aws_cloud_search. In this section, we will use the documents prepared in the tutorial to search for simplicity of explanation. You need to finish the tutorial before you proceed. The way to index your own documents with aws_cloud_search will described in the later section.
Setup aws_cloud_search
Install aws_cloud_search. We use RubyGems. Run gem install asw_cloud_search on your terminal.
$ gem install aws_cloud_search
Successfully installed aws_cloud_search-0.0.2
1 gem installed
Installing ri documentation for aws_cloud_search-0.0.2...
Installing RDoc documentation for aws_cloud_search-0.0.2...
Prepare a script to direct the requests to Groonga CloudSearch
As the URLs that aws_cloud_search to connect with are hard-coded, we need a small patch to modify them.
Save the following code as dirct_to_local_gcs.rb.
# A small hack to use Groonga CloudSearch.
# We override these three methods to direct requests Groonga CloudSearch
# working on the localhost:7575.
# We use http://xip.io/, which provides wildcard DNS for any IP address.
module AWSCloudSearch
  def self.search_url(domain, region="us-east-1")
    "http://search-#{domain}.#{region}.127.0.0.1.xip.io:7575"
  end

  def self.document_url(domain, region="us-east-1")
    "http://doc-#{domain}.#{region}.127.0.0.1.xip.io:7575"
  end

  def self.configuration_url
    "https://cloudsearch.us-east-1.127.0.0.1.xip.io:7575"
  end
end
This code overrides aws_cloud_search to direct its requests to Groonga CloudSearch, which is running on localhost:7575.
Search the documents
In order to illustrate how to make search requests with aws_cloud_search for Groonga CloudSearch, we create a small script to search the example domain on localhost:7575, which is created the tutorial.
Save the following code as search.rb.
#!/usr/bin/env ruby

require 'aws_cloud_search'
require './direct_to_local_gcs' # direct requests to localhost:7575

# Initiate a CloudSearch object corresponds to the example domain.
domain_name = 'example-00000000000000000000000000'
cloud_search = AWSCloudSearch::CloudSearch.new(domain_name)

# Take a query string from the command line argument.
query = ARGV.join(' ')

# Create a search request object for the query.
search_request = AWSCloudSearch::SearchRequest.new
search_request.q = query

# Issue the request.
search_response = cloud_search.search(search_request)

# Show the results.
puts "#{search_response.found} documents are found for the query '#{query}':"

search_response.hits.each do |hit|
  p hit
end
You can execute the search with the script by ruby search.rb [query]. Don’t forget to start gcs server on localhost:7575 beforehand (See details in the tutorial).
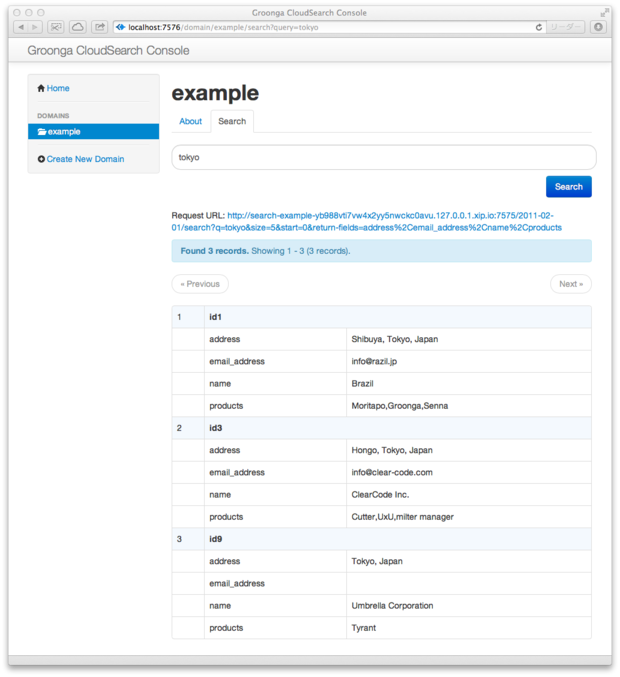
The output should be like the following:
$ ruby search.rb tokyo
3 documents are found for the query 'tokyo':
{"id"=>"id1", "data"=>{"_id"=>[1], "_key"=>["id1"], "address"=>["Shibuya, Tokyo, Japan"], "email_address"=>["info@razil.jp"], "name"=>["Brazil"]}}
{"id"=>"id3", "data"=>{"_id"=>[3], "_key"=>["id3"], "address"=>["Hongo, Tokyo, Japan"], "email_address"=>["info@clear-code.com"], "name"=>["ClearCode Inc."]}}
{"id"=>"id9", "data"=>{"_id"=>[9], "_key"=>["id9"], "address"=>["Tokyo, Japan"], "email_address"=>[""], "name"=>["Umbrella Corporation"]}}
It works. You can modify this script to fit on your needs.
Index your documents
This section describes the way to index your documents by aws_cloud_search. For explanation, we create a simple CUI tool to index an entry given from command line arguments.
Save the following code as index.rb.
#!/usr/bin/env ruby

require 'aws_cloud_search'
require './direct_to_local_gcs' # direct requests to localhost:7575

# Initiate a CloudSearch object corresponds to the example domain.
domain_name = 'example-00000000000000000000000000'
cloud_search = AWSCloudSearch::CloudSearch.new(domain_name)

# Take the data from command line arguments.
id, name, address, email_address = ARGV

# Create a document to be indexed.
document = AWSCloudSearch::Document.new

document.id = id
document.add_field :name, name
document.add_field :address, address
document.add_field :email_address, email_address

# Create a batch to index the document.
batch = AWSCloudSearch::DocumentBatch.new
batch.add_document document

# Issue the request.
response = cloud_search.documents_batch(batch)

# Show the response.
p response
The script index.rb takes four arguments: id, name, address and email_addess. Let us try to index a document.
$ ruby index.rb id11 "Snowy Corporation" "Tokyo, Japan" snowy@example.com
{"status"=>"success", "adds"=>1, "deletes"=>0}
The document is successfully indexed.
Search by query tokyo again to check if the new document is searchable.
$ ruby search.rb tokyo
4 documents are found for the query 'tokyo':
{"id"=>"id1", "data"=>{"_id"=>[1], "_key"=>["id1"], "address"=>["Shibuya, Tokyo, Japan"], "email_address"=>["info@razil.jp"], "name"=>["Brazil"]}}
{"id"=>"id3", "data"=>{"_id"=>[3], "_key"=>["id3"], "address"=>["Hongo, Tokyo, Japan"], "email_address"=>["info@clear-code.com"], "name"=>["ClearCode Inc."]}}
{"id"=>"id9", "data"=>{"_id"=>[9], "_key"=>["id9"], "address"=>["Tokyo, Japan"], "email_address"=>[""], "name"=>["Umbrella Corporation"]}}
{"id"=>"id11", "data"=>{"_id"=>[20], "_key"=>["id11"], "address"=>["Tokyo, Japan"], "email_address"=>["snowy@example.com"], "name"=>["Snowy Corporation"]}}
The number of hit documents have increased to 4 (formerly it was 3), as it includes the new document. The last document is that we have indexed by index.rb script.
Remove the documents
Removing document is done by the quite similar way to indexing. Save the following code as delete.rb.
#!/usr/bin/env ruby

require 'aws_cloud_search'
require './direct_to_local_gcs' # direct requests to localhost:7575

# Initiate a CloudSearch object corresponds to the example domain.
domain_name = 'example-00000000000000000000000000'
cloud_search = AWSCloudSearch::CloudSearch.new(domain_name)

# Take the document id to be deleted from the command line argument.
id = ARGV.shift

# Create a document to be deleted.
document = AWSCloudSearch::Document.new
document.id = id

# Create a batch to remove the document.
batch = AWSCloudSearch::DocumentBatch.new
batch.delete_document document

# Issue the request.
response = cloud_search.documents_batch(batch)

# Show the response
p response
In order to delete the document with id = id11 (the document added in the previous section), run ruby index.rb id11.
$ ruby delete.rb id11
{"status"=>"success", "adds"=>0, "deletes"=>1}
The removed entry, Snowy Corporation is no longer appeared in the search results.
$ ruby search.rb tokyo
3 documents are found for the query 'tokyo':
{"id"=>"id1", "data"=>{"_id"=>[1], "_key"=>["id1"], "address"=>["Shibuya, Tokyo, Japan"], "email_address"=>["info@razil.jp"], "name"=>["Brazil"]}}
{"id"=>"id3", "data"=>{"_id"=>[3], "_key"=>["id3"], "address"=>["Hongo, Tokyo, Japan"], "email_address"=>["info@clear-code.com"], "name"=>["ClearCode Inc."]}}
{"id"=>"id9", "data"=>{"_id"=>[9], "_key"=>["id9"], "address"=>["Tokyo, Japan"], "email_address"=>[""], "name"=>["Umbrella Corporation"]}}
Conclusions
We have introduced aws_cloud_search gem, which wraps Amazon CloudSearch. With a small modification (monkey patching) of aws_cloud_search gem, we can use it with Groonga CloudSearch. We have described about the patch and how to create scripts to search, index and remove the documents with aws_cloud_search and Groonga CloudSearch.
Today we shipped the initial release of “Groonga CloudSearch”. Groonga CloudSearch is an Amazon CloudSearch compatible open source full text search server. By Groonga CloudSearch, you can try Amazon CloudSearch API without paying any fee. It is made for all Web developers who are planning to build Web applications with Amazon CloudSearch. You can download the package and read the tutorial on the home page of this project site.
What’s Amazon CloudSearch?
Amazon CloudSearch provides ability to index and search various documents in the cloud. You can upload documents and get the search result as JSON resources via its Web API. So, you can build Web applications easily, without setting up your custom search system (Solr, etc.) - instead you can use Amazon CloudSearch as its back-end.
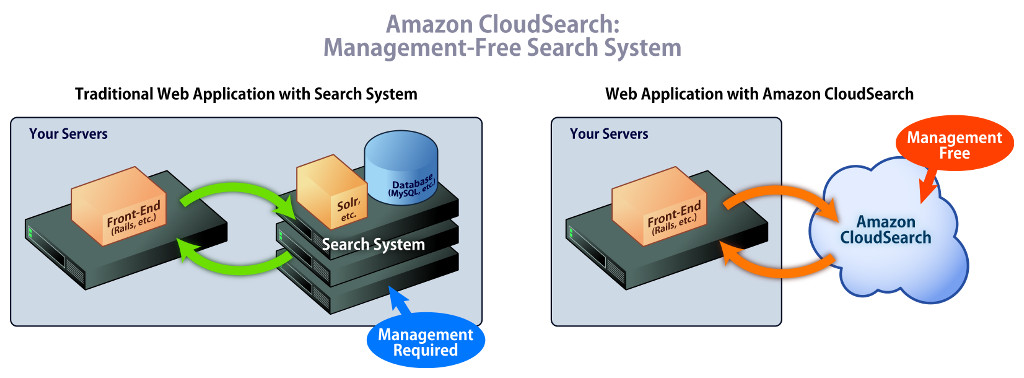
However, there are two issues. First, you have to learn about how to use Amazon CloudSearch API, from the documents. Secondly, it is a fee-based online service, so you have to pay money to try any features - even if you just want to learn the API. So, it may be hard to try the API.
How Groonga CloudSearch helps you?
Groonga CloudSearch resolves the above two issues. You can learn about Amazon CloudSearch API usage without any fee. You can use Groonga CloudSearch instead of Amazon CloudSearch for learning API usage.
It has “Cloud” in its name it’s not a SaaS. It is a software that can be installed to your computer. You can try Amazon CloudSearch API on your computer because Groonga CloudSearch provides Amazon CloudSearch compatible API.
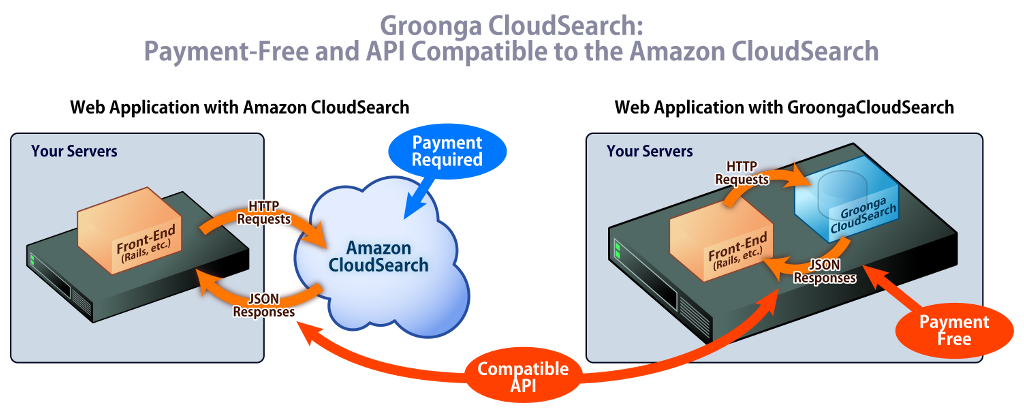
You can develop your Web applications that use Amazon CloudSearch on your computer with Groonga CloudSearch. You don’t need to pay any fee for developing and testing your Web applications. When you are ready to release your service on the Web, you’ll switch the back-end from Groonga CloudSearch to Amazon CloudSearch. You just change the endpoint (host name of the URL to access to APIs) from “localhost” to “amazonaws.com”.
Currently, Groonga CloudSearch supports only some basic features of Amazon CloudSearch APIs. We are keeping up to grow the compatibility. If you’d like to get involved, fork the repository on GitHub and send pull requests to us, please. Of course, we also welcome your feedback.